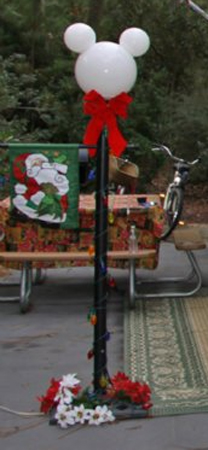
Have you ever visited Disney’s Fort Wilderness Resort and Campground and
admired those wonderful lamp posts with the Mickey Mouse ears? Me too!
Many of the campers at Fort Wilderness proudly display them at their
campsites.
They stand about six-and-a-half feet tall and they look awesome!
When I fist saw one I was so taken with it that I asked the camper, “Where
do you buy them?”
I was disappointed when he grinned and said, “You can’t buy them;
you have to make them.”
But my wife Carol was determined to have one for our campsite so she did a bit of online
exploring and soon found a list of the basic parts required to build a lamp.
It wasn't long before I had all the
parts and I started to work on my very first Mickey Lamp!
I was surprised at how easy it was to build!
It turned out quite well. So well in fact that several friends wanted me to
make them lamps too.
I have now made more than fifty lamps and in the process I
have refined my technique.
Here are some instructions which you can use to
make your own lamp.
After all,
no true Disney fan should be without one!
All of your friends and neighbors already think that you’re a crazy Disney
nut . . . why not prove it to them by building one of these beauties!
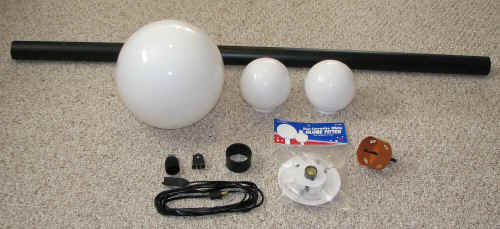
All the parts you need are
available at Home Depot. If your local store doesn’t carry all the parts
you can easily order them online.
The parts to build a complete lamp (including the base
and smaller lights to illuminate the ears) will cost you about $250 - $300.
All prices are in US Dollars.
Keep in mind I am not a certified or trained electrician and I am simply
offering the "how to" that worked for me. Use
caution, always, when building electrical lamps. Seek professional advice as
needed.
The
key parts are:
Quantity
Name
Price
1
Solus 12 in. Dia Globe White Smooth Acrylic with 5.25 in. Inside Diameter
Neckless Opening
(Be sure to order WHITE - not clear or prismatic)
$27.90
2
Solus 6 in. Dia Globes White
Smooth Acrylic with 3 1/4 in. Outside Diameter Fitter Neck
(Note: You only
need two 6" globes but they are apparently only sold in a 4-pack)
$51.60 (4-pack)
1
Solus Polycarbonate Wing Clip Post Top Fitter (Comes in black or white)
$14.90
Home Depot
online prices as of August 2023
NOTE: The Solus 12" Outdoor Globe and the Solus
Post Top Fitter (also referred to as a Globe Fitter) are no longer stocked
in most US Home Depot stores. They are available online for home
delivery or pickup at your local store. The 6" globes are stocked in
some US stores. None of these items are available in
Canada.
You can also find all the
components you need, including the globe fitter, on Amazon.com
At the very bottom of this page is a video that was taken as I made a lamp
several years ago. It follows the process step by step and includes
some comments that might help you as you make your own lamp. Be sure
to watch the video before you start.
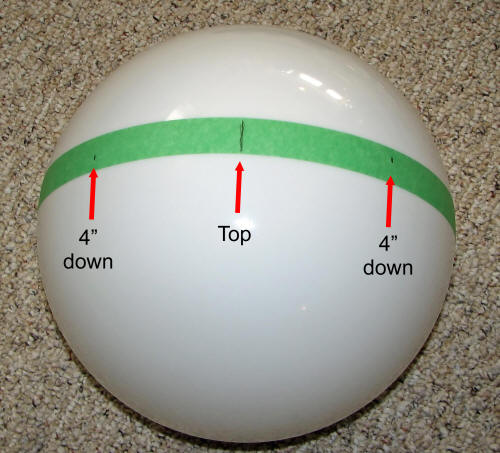
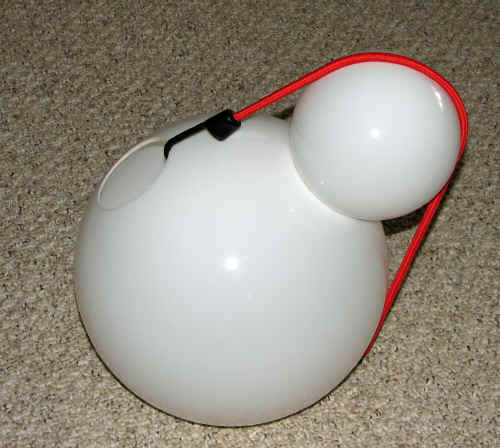
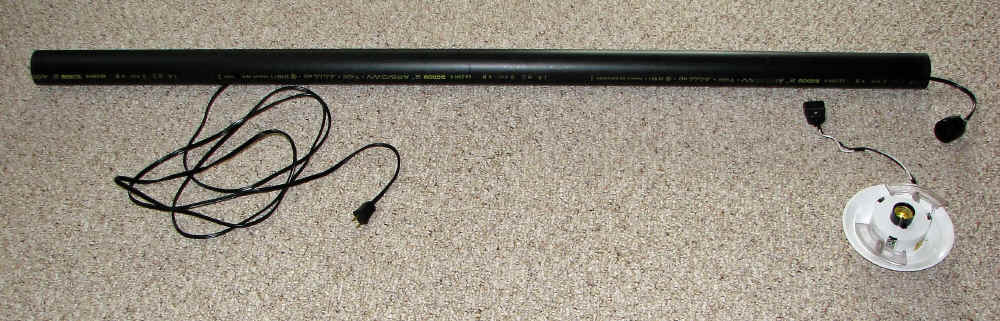
Step
1: Build Mickey’s head
To do this you simply drill two 3 ¼ inch holes in the 12
inch globe and glue the 6 inch globes into these holes.
Begin with the 12
inch globe. Apply masking tape across the top of the globe along the center
line in order to mark the centers for the holes needed to mount the smaller
globes.
Draw a line at the “top dead center” of the lamp and then measure
down 4 inches on each side and make another mark.
This will mark the
centers for each ear hole; the centers should be 8 inches apart.
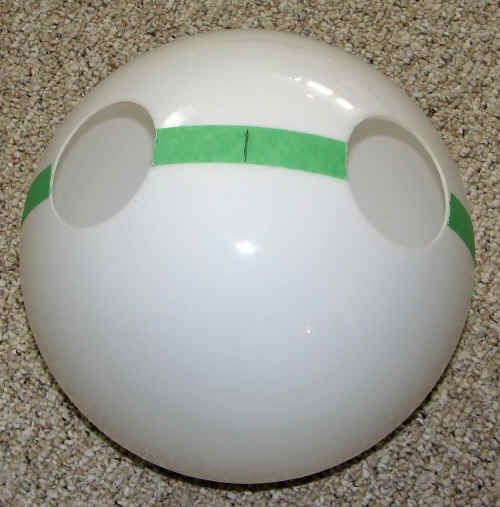
Drill a small lead hole for each ear and then use your electric drill and a
3 ¼ inch hole saw to cut the ear holes.
(If you don’t have a 3 ¼” hole saw you can buy one [about $16.00 at Home Depot]
and the mandrel needed to attach it to your electric drill. Any employee at
Home Depot can find these tools for you.)
When you use the hole saw, keep it flat to the surface of the globe and keep
it moving at all times. If you stop the saw in the middle of the cut it may
jam and crack the globe.
Use light pressure, don't
press too hard.
I have found that the hole
saw melts it's way through as much as it cuts it's way through.
Just rub around the edges
with a file or sandpaper to remove any beads of melted acrylic and you're
ready to glue!
Remove the
tape and glue the smaller globes into these holes, clamp until the glue is
set.
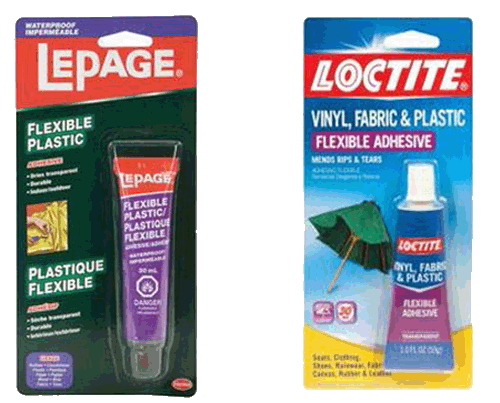
I use
LePage’s Flexible Plastic adhesive which is sold in Home Depot in Canada.
In the USA look for Loctite, it’s the same product.
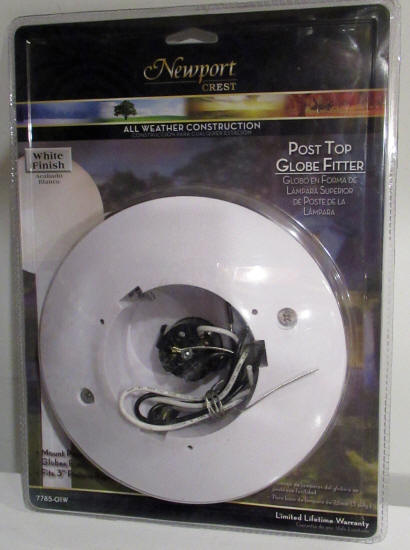
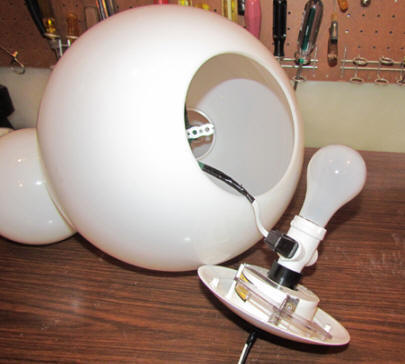
The Globe
Fitter attaches to the bottom of the 12” globe and holds the light bulb.
It is designed to clamp onto a standard 3 inch metal lamp post also sold at
Home Depot.
If you
already have a lamp post in your front yard it is probably 3" diameter . . .
that's the standard size . . . and this fitter will easily clamp on to it.
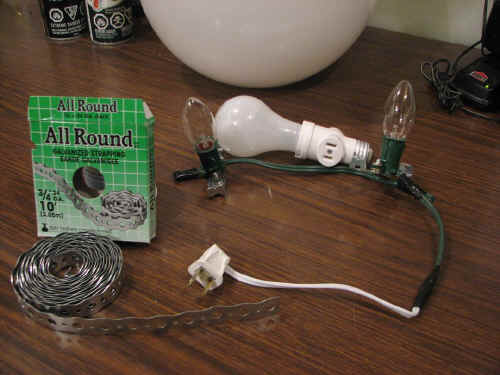
Step 2: Illuminate the Ears
I think it's very important to add smaller bulbs to illuminate the ears as well
as the larger globe. It really adds to the effect of the lamp.
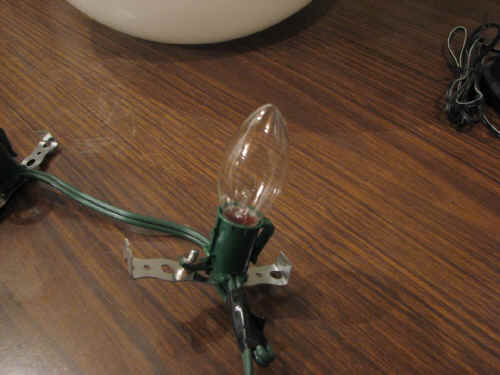
Begin
with a piece of metal strapping, about 4 inches long.Bend about ¼ inch on each end so that the ends will create a
“friction grip” on the flange of the 6” globe which is now visible
inside the 12” globe. Test it by sliding it onto the flange of the 6"
globe (see the picture below) and adjust the length as necessary. It
should be a snug fit but it needs to slide easily so you can replace the
bulbs.
Make
2 of these pieces, one for each of Mickey’s ears.
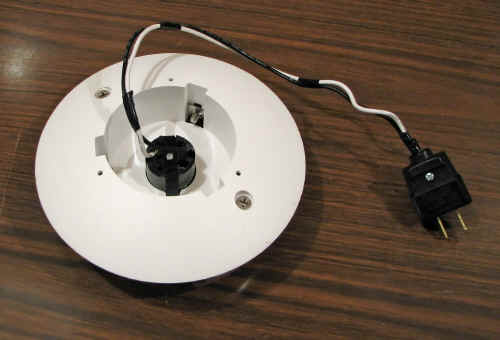
Cut
a length of outdoor Christmas lights so that you have 2 socket and enough
cord on one end to attach a plug.Use
pop-rivets to attach each socket to one of the metal straps you just made.Attach a plug which will plug into the new white socket (pictured on
the left) inside the globe.
Your
assembly should look like picture on the left.
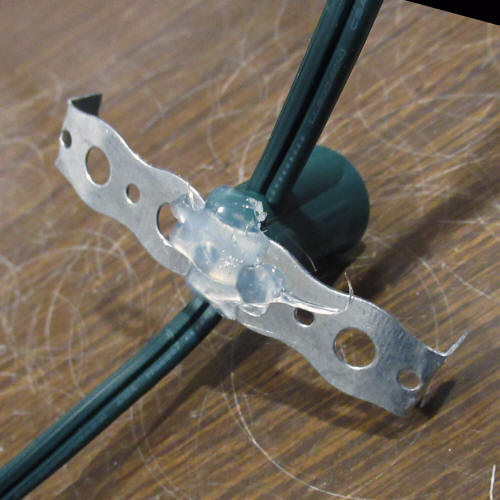
Here is a detailed look at the light socket riveted to
the strap. Note the 90 degree
bends in the ends of the strap which provide a “friction grip” on the
flanges of Mickey’s ears, inside the larger globe.Bend them to provide a snug fit and just slide them on.
If your light socket doesn't have a little flange to hold
a pop-rivet, simply use a hot-glue gun to attach the metal strap to the
light socket. Cover the base of the socket with hot glue and press the
metal bracket into the glue. Once it has cooled and hardened, add
another layer of glue across the top to hold it firmly together.
When I use a hot-glue gun I also wrap
the glued
connection with electrical tape to strengthen the joint.
Inside the 12" globe - the strap
just slides onto the flange of the 6" globe.
Plug the string of smaller
lights into the globe fitter.
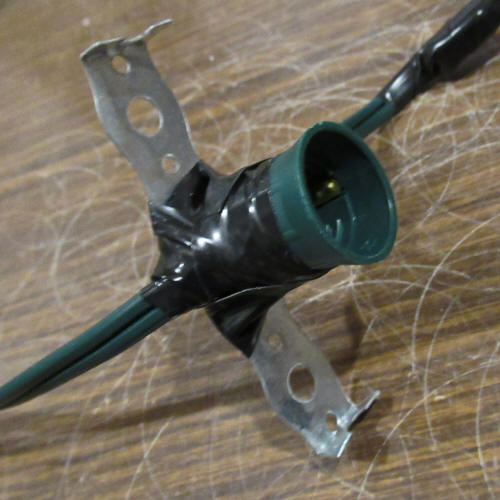
Step 3:
Attach Mickey’s head to a lamp post
You can
order a 3 inch lamp post online from Home Depot,
but your local store probably carries a variety of them. along with a metal mounting bracket
if you need one.
If you are going to permanently mount your
lamp on a patio or deck, these items are what you need. Just wire it up,
install it on your patio or deck and you are all done!
Congratulations,
you have just built a Mickey Lamp – don’t you feel proud?
Step 4:
Do you need a portable lamp?
If you are
like me, and prefer to have your lamp more portable, the rest of these
instructions are for you!
I need to have one that comes
apart easily to store in the hatches under our RV. I use standard 2 inch
ABS pipe for the post but PVC pipe is very similar and works well too.
ABS or PVC is the pipe used by plumbers for household
drains and it’s available in any building products store. It’s light, easy
to work with and it doesn’t rattle in the RV.
You need one piece of 2” ABS or
PVC pipe about 5 feet long and one coupler (that is the piece plumbers use to
glue two pieces of ABS or PVC pipe together)
NOTE: You do not need
any glue!
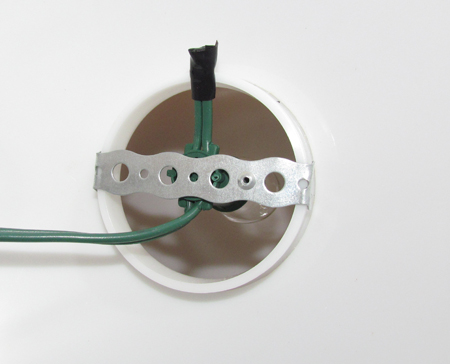
Let’s start
by getting the globe fitter ready to attach to the ABS pipe. First step:
Attach a standard plug to the globe fitter.
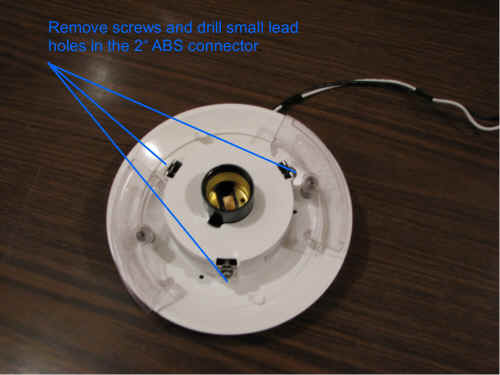
Now you need
to attach the ABS coupler to the globe fitter. Remove the three clamp
screws from the fitter:
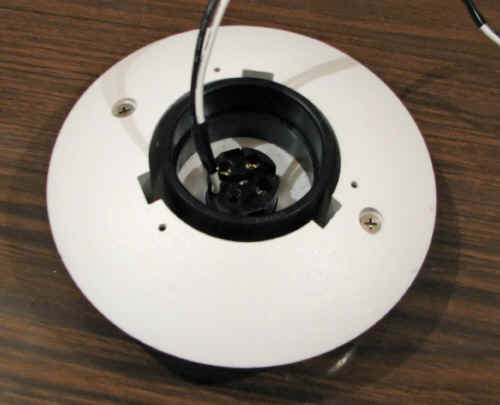
Insert the
ABS coupler in the hole on the bottom of the globe fitter (it’s a very
loose fit) and drill small lead holes through the holes where you removed
the clamp screws.
Use 1 inch screws to attach the coupler to the globe
fitter.
You have simply swapped the small retaining screws for 1 inch
screws which hold the ABS coupler tightly in place.
This piece will now slide on
and off the ABS or PVC drain pipe which will be your post. This makes
it easy to take the lamp apart and move it.
Do not use glue!
Now drill a ½ inch hole about a
foot from the bottom of the ABS pipe and feed a length of power cord up
through the pole. Add a female receptacle to the top end of the cord and a
male plug to the bottom.
Plug the fitter into the female
receptacle you just added to the top; slide the globe fitter onto your post
and install a 25 watt frosted light bulb.
Place the globe on the fitter and
enjoy your lamp.
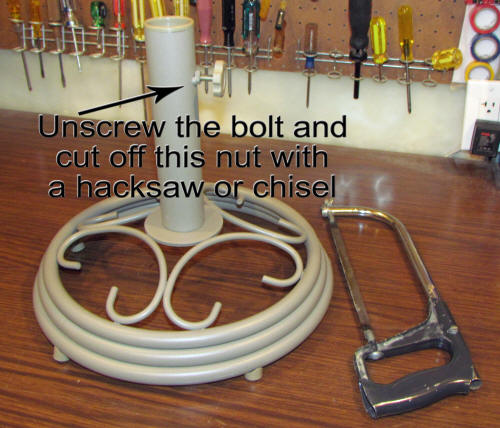
You will need to devise a base
for the lamp.
I like to use a cast metal base for a patio umbrella (WalMart –
about $20 - $25). You simply use a chisel or hacksaw to knock off the nut
which holds the retaining bolt and the ABS post will slide right over top of the post on the
umbrella base. I paint it black to match the post, then drill through
the post and the base to secure it with two
long bolts and wing nuts.
Be sure that your base weighs
20 - 30 pounds or more. It needs to be heavy enough to prevent
your lamp from blowing over. The umbrella base has worked very well for me.
Christmas tree bases are
usually not heavy enough and are not very reliable.
I cannot stress it enough - if your lamp is on a portable
base your biggest enemy is wind!
Be sure to use a heavy base!
The base
illustrated on the left is the best I've used so far for outdoor
applications. It's a 30 pound patio umbrella base, about 18" in
diameter. I used to buy them for about $30 at Christmas Tree Shops
before that retail chain went bankrupt. I think Wal-Mart carries a very
similar product in the USA.
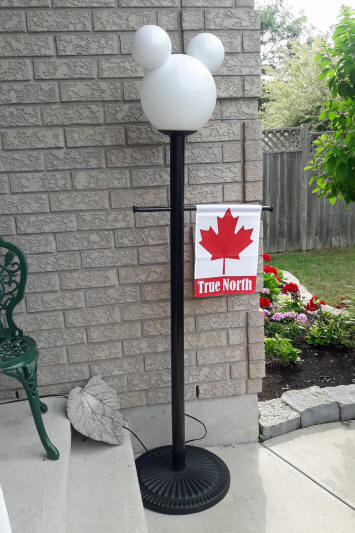
Would you like to
add a cross-bar to the post? A place to hand a flag, pennant or sign?
That's very easy to do . . . just cut a length of dowel (or a replacement
broom handle) to the length you want and drill an appropriately sized hole
through the ABS post.
I use 3/4" dowel. Be very careful to keep the holes exactly
level and even
so that your cross-bar will be level. Use a drill press if you can, or
measure very carefully!
Slide the dowel
through the two holes and add some decorative end caps. I use wooden
drawer pulls from Home Depot, the kind you find on the drawers in your
kitchen cupboards. Just screw one on each end of the dowel to add the
finishing touch to your cross-bar.
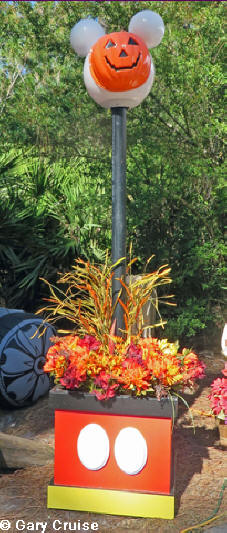
Some ingenious folks have used unique things to make a heavy base for their
lamp. My favorite so far is an old farmer’s milk can painted in
Mickey’s colors, red, black and yellow. It looks great!
A custom-built base for Mickey!
One of my completed lamps.
If you are ordering online from Home Depot, here are those descriptions again, to help you locate what you need:
12" acrylic
globe & globe fitter
Solus 12 in. Dia Globe White Smooth Acrylic with 5.25 in. Inside Diameter
Neckless Opening $27.90
6" acrylic
globe (you need 2 of theses)
Solus 6 in. Dia Globes White
Smooth Acrylic with 3 1/4 in Outside Diameter Fitter Neck $51.60
(4-Pack)
Globe Fitter
Solus Polycarbonate Wing Clip Post Top Fitter
$14.90
Shipping is usually
free if your order exceeds $45.00
ENJOY MAKING YOURS!
Gary Cruise
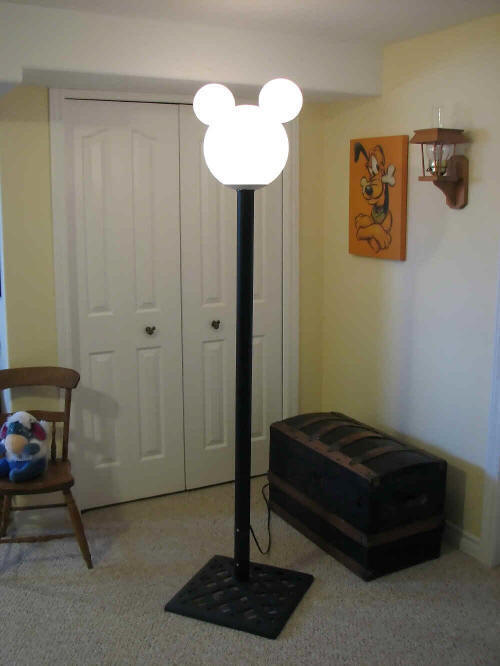
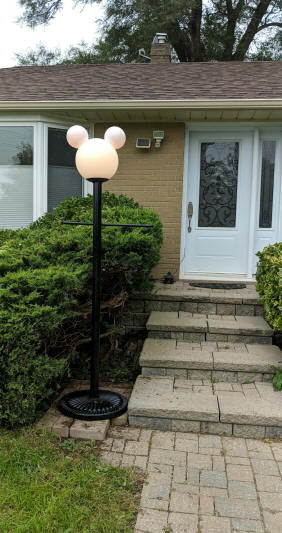
Some people keep their Mickey lamp outdoors!
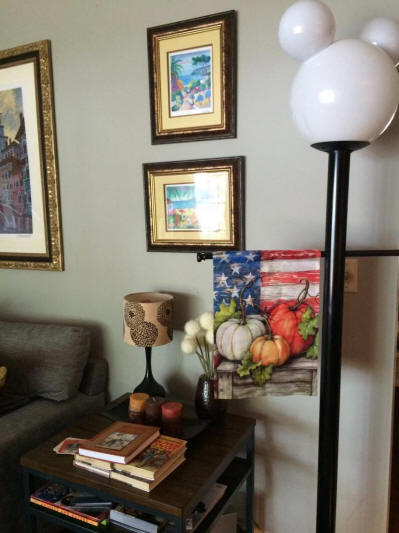
Others
proudly display him inside!
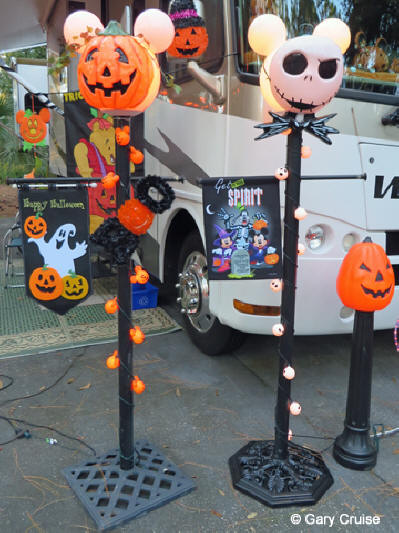
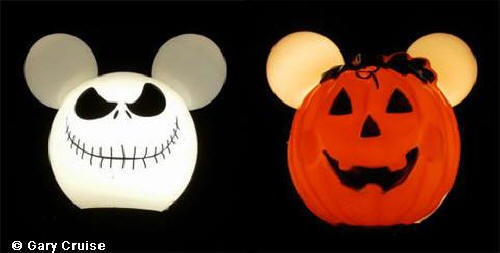
Wrap the post with lights and add a mask!
They look great after dark!
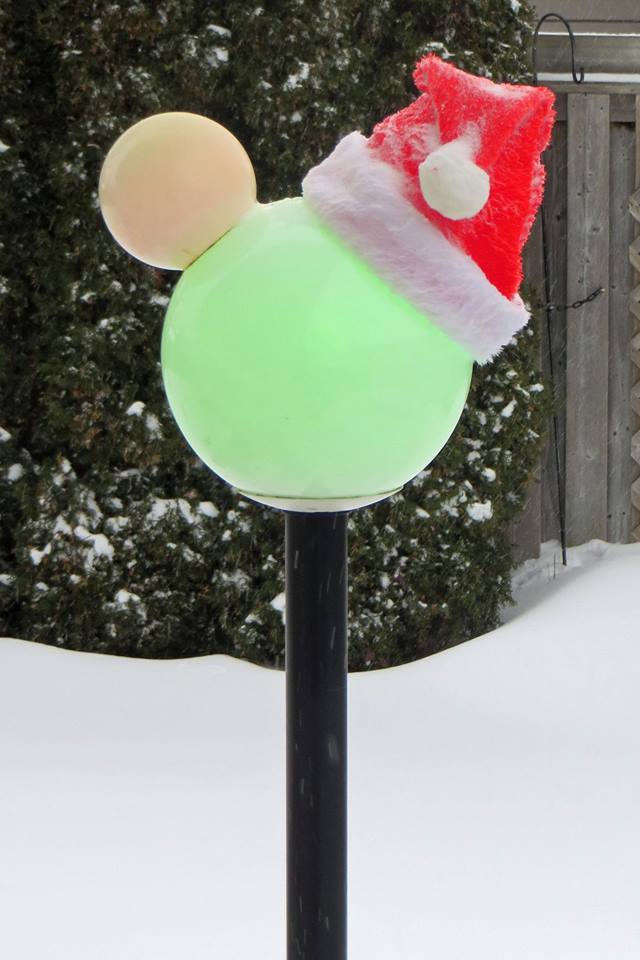
Change the bulbs to change colors!
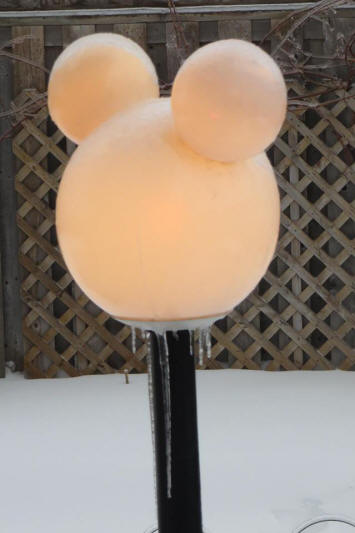
A Mickey lamp is 'outdoor safe' and can stand
up to Canada's worst winter weather!
Here's a YouTube video
our friends Cheryl and Katie produced for their vlog site after they watched me make a
lamp.
Click the icon at the bottom right to watch it 'Full-Screen'.
I hope their video will help you put your Mickey lamp together!